Introduction
Ever stared at your biometric entry pad wondering why it refuses to recognize your thumbprint or why admin access vanished? Finding the fingerprint door lock reset button is the fastest way to wipe software glitches and restore factory settings when you are locked out. This guide covers exact brand locations, step-by-step reset instructions, and essential safety precautions so you can regain control of your entryway securely.
Table of Contents
Where is the Reset Button Located on a Fingerprint Door Lock?
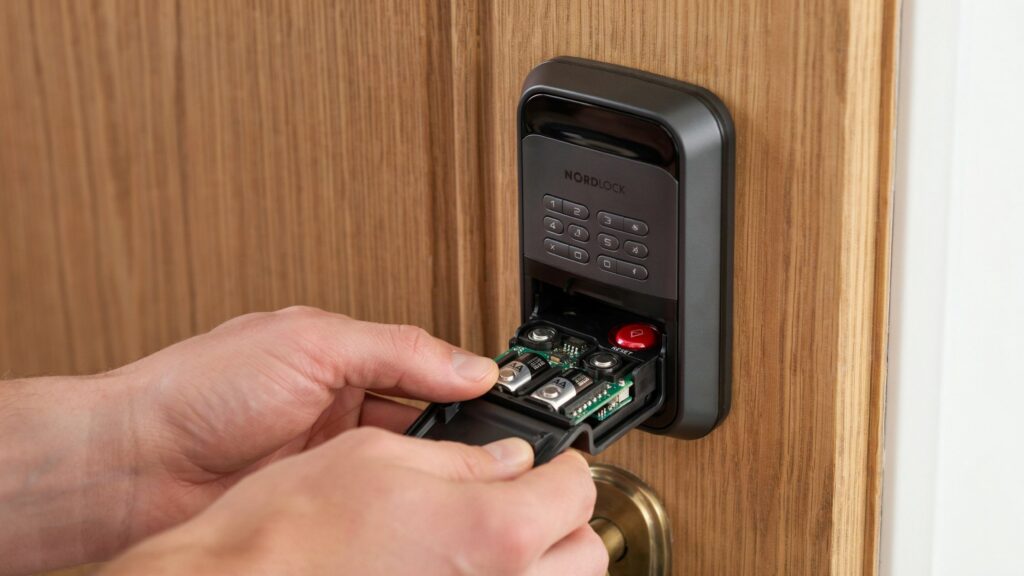
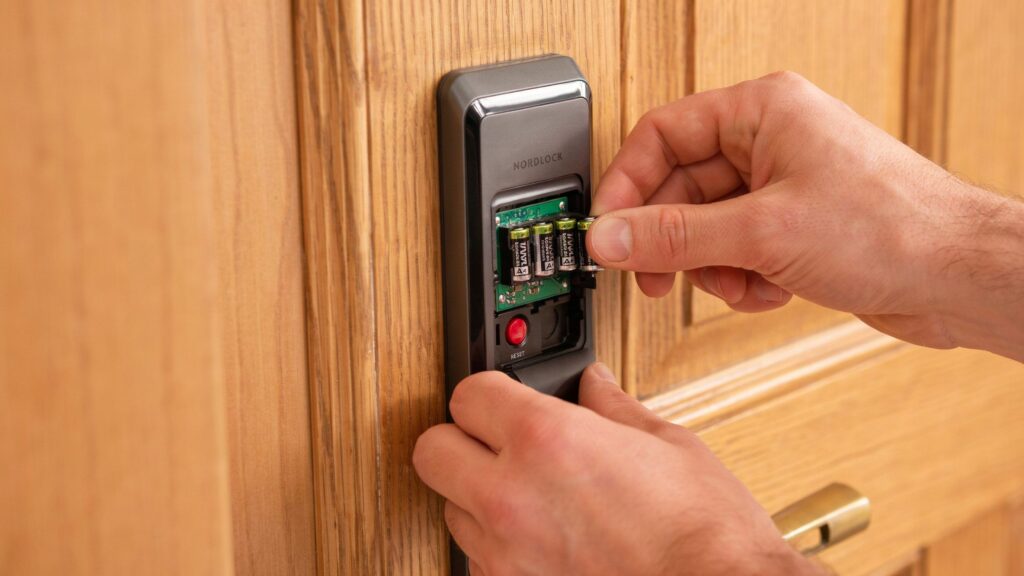
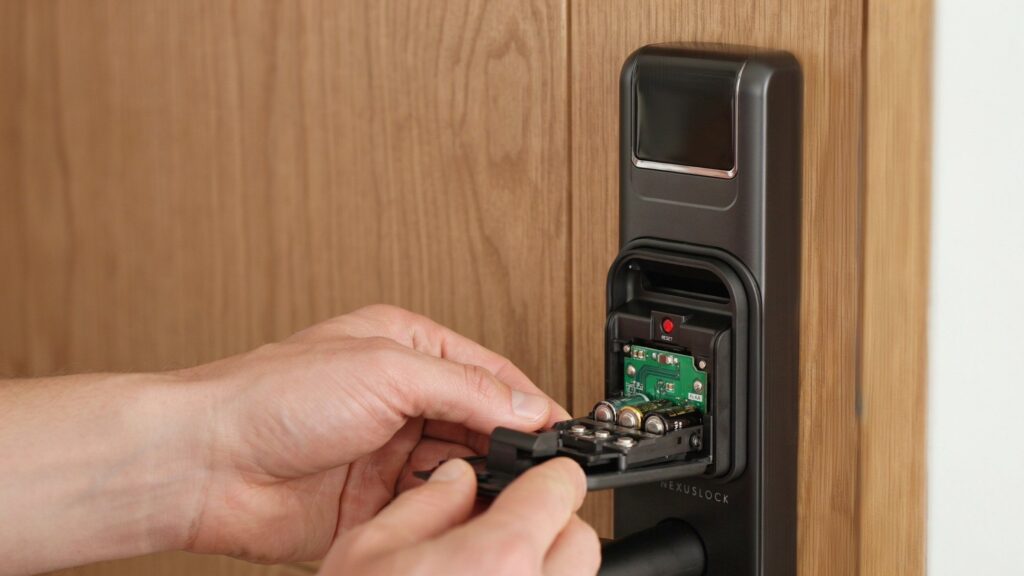
The reset button on a fingerprint door lock is almost always located on the interior back panel (interior escutcheon panel) or tucked securely inside the battery compartment panel to prevent tampering from the outside. In most home and office models, you will find it as a small red reset button or a tiny recessed pinhole reset button on digital door lock assemblies behind the battery cover.
Understanding where this button lives is the critical first step before attempting any factory default restore. Because biometric lock manufacturers prioritize physical security, they never place the physical reset button on the smart lock exterior where an intruder could reach it. On popular residential smart locks sold across the United States—like those installed on standard 1-3/8 to 1-3/4 inch thick American exterior doors—you typically need to slide off or unscrew the interior back cover to gain access.
Depending on your lock’s specific design, the reset button generally appears in one of three common locations:
- Inside the Battery Compartment: Remove the battery cover plate on the indoor side of your door. Look near or directly below the battery slots for a small round button or a labeled pinhole reset button.
- On the Interior Escutcheon Panel: Check the sides, bottom rim, or lower back plate of the interior handle assembly. Some models feature a distinct red reset button on the electronic lock frame itself.
- Beside the Main Circuit Board (PCB): On sleeker mortise or deadbolt designs, the button sits right next to the internal wiring harness beneath a protective rubber plug.
If you are dealing with a recessed slot, you will need a small pinhole tool / SIM ejector tool or a straightened paperclip to reach and press the micro-switch inside. Locating this button correctly ensures you can clear memory glitches or prepare your lock for new users without causing unnecessary wear or damage to the internal board.
Once you locate your button, knowing how to execute a proper system reboot cycle is essential—especially if you’re troubleshooting an installation issue or upgrading from a standard keyless setup, which connects directly to our guide on How to Install a Fingerprint Door Lock (DIY Guide).
Step-by-Step Guide: How to Reset a Fingerprint Lock Using the Reset Button
To reset a fingerprint door lock using its physical reset button, press and hold the button for 10 to 15 seconds until you hear an audio beep confirmation signal or see a flashing LED light indicating the lock has returned to its factory default restore state. Once the system finishes its reboot cycle, every saved credential—including all biometric data and passcodes—will be completely erased, allowing you to set up the lock from scratch.
Step 1: Prepare the Hardware and Backup Access
Before initiating a factory reset, ensure your door is unlocked and fully open. Working with the door propped open prevents an accidental lockout if the latch engages during the reset process. Check your battery power levels; a low battery voltage interruption midway through a factory wipe can corrupt the firmware on the internal circuit board. If your lock uses a recessed button, grab a pinhole tool / SIM ejector tool or a sturdy paperclip before removing the battery compartment panel cover on the interior escutcheon panel.
Step 2: Locate and Engage the Physical Reset Button
Access the interior assembly where the physical reset button on smart lock units is housed. If your model features a red reset button on electronic lock frames, press and hold it firmly with your thumb or finger. For recessed micro-switches, insert your pinhole tool straight into the opening until you feel a soft tactile click.
Step 3: Hold the Button for the Required Duration
Maintain constant pressure on the button. You must hold reset button for 10 to 15 seconds without releasing it early. Releasing pressure after just 3 or 4 seconds usually triggers a soft restart rather than a full smart lock factory reset button cycle.
Step 4: Listen for the Audio Beep Confirmation Signal
Keep holding the button down until the lock communicates that the reset is complete. Biometric locks signal success through an audio beep confirmation signal (often 2 to 3 distinct beeps or a long continuous chime) or a shifting LED indicator light (such as flashing red to green). Once you hear or see this cue, let go of the button and allow the lock 30 to 60 seconds to finish its system reboot cycle.
Step 5: Verify User Fingerprint Data Deletion
After the lock reboots, test the sensor with an unregistered finger (such as an index finger or pinky finger that was never programmed). If the factory default restore succeeded, the latch will unlock for any finger—or reject all fingers entirely until a new master administrator fingerprint is registered.
Completing this procedure allows you to perform a clean fingerprint lock reset without admin code access, which is ideal when taking over a rental property or clearing a system glitch. If you ever need to access your door via alternative credentials when electronic sensors fail, check out our guide on How to Open Electronic Door Lock With Code (No Key).
How Long Do You Need to Hold the Fingerprint Lock Reset Button?
You need to hold the fingerprint lock reset button continuously for 10 to 15 seconds to successfully perform a full factory default restore. Releasing the physical reset button on smart lock units too early—typically under 5 seconds—will only initiate a partial reboot rather than a complete memory wipe.
Timing is critical because biometric lock microcontrollers use hold duration to differentiate between an accidental tap and an intentional hard reset. For example, if a child presses the red reset button on electronic lock frames for just 2 or 3 seconds, the system reboots without clearing your saved settings. However, maintaining continuous pressure triggers the system reboot cycle, purging all admin credentials and stored user profiles.
Here is what happens during each holding threshold:
- 1 to 4 Seconds (Soft Restart): The lock power-cycles or clears current keypad entry attempts, but all saved user fingerprints stay intact.
- 5 to 9 Seconds (Alert Mode): The biometric scanner sensor status light begins flashing red or yellow, warning that a factory reset is imminent.
- 10 to 15 Seconds (Full Factory Reset): A long audio beep confirmation signal sounds, indicating complete user fingerprint data deletion and a return to default settings.
Using a sturdy pinhole tool / SIM ejector tool ensures steady pressure when engaging a tiny pinhole reset button on digital door lock mechanisms tucked inside the battery compartment panel. If you release pressure before hearing the final chime, the lock will cancel the process, forcing you to start over.
Once the wipe is complete, re-registering your master administrator fingerprint is necessary to restore full security before configuring your daily access passcodes—a topic we cover in detail in our guide on How to Install a Fingerprint Door Lock (DIY Guide).
What Happens Immediately After Pressing the Biometric Reset Button?
Immediately after pressing and holding the biometric reset button, the smart lock triggers a complete hardware wipe that erases all saved user profiles, access codes, and custom settings. Within 2 to 5 seconds of releasing the button, the system initiates a system reboot cycle, accompanied by an audio beep confirmation signal or a flashing LED status light on the interior escutcheon panel.
Understanding this immediate post-reset state is essential because your door lock essentially reverts to its factory default restore mode. At this point, the internal memory performs a total user fingerprint data deletion, clearing every stored print from the optical or capacitive biometric scanner sensor. If you previously configured auto-lock timers, mobile app pairings, or temporary guest PINs, all of those preferences are instantly wiped clean.
Here is the exact sequence of events that occurs right after the reset executes:
- Memory Wipe Execution: The onboard microcontroller purges all stored admin credentials, biometric scans, and wireless network pairings from non-volatile memory.
- System Status Indicators: Once the hardware wipe executes successfully, the lock emits a distinct series of audible tones or flashes a dual-color LED sequence to verify that the factory restoration cycle has completed.
- System Reboot Cycle: The lock powers off briefly for 10 to 30 seconds to restart its core firmware and initialize default factory protocols.
- Open Access / Default Mode: The lock enters an unconfigured state where any unregistered finger or default factory code (like 123456) can operate the latch until a new admin is assigned.
Because the lock is completely unsecure in this default state, you must immediately re-register a new master administrator fingerprint before leaving the door unattended. If you are resetting the device due to hardware glitches or keypad unresponsiveness, knowing how to test alternative unlock methods is crucial, which connects seamlessly to our troubleshooting guide on How to Open Electronic Door Lock With Code (No Key).
How to Re-Register Admin Fingerprints After Resetting
To re-register admin fingerprints after using the fingerprint door lock reset button, wake up the keypad, enter the default master code or press the registration key, and scan your primary finger 3 to 5 times until the lock confirms a successful save. Registering your administrator credentials immediately after a factory reset is critical because unconfigured locks remain in open setup mode, allowing anyone to access your home or modify settings.
Step 1: Initiate Admin Registration Mode
Once your smart lock finishes its system reboot cycle after pressing the physical reset button on smart lock units, touch the keypad or biometric scanner sensor to wake up the system. Most biometric models require pressing * followed by # (or a dedicated interior setup button near the battery compartment panel) and entering the factory default master code—usually 123456 or 000000—to access the admin programming menu.
Step 2: Register Primary Master Administrator Fingerprint
Select the “Add Administrator” option from the voice prompt or menu. Clean your finger and place it firmly onto the biometric scanner sensor. Scan the same finger 3 to 5 times at slightly different angles—shifting your thumb or index finger tip, sides, and center—until you hear an audio beep confirmation signal confirming registration.
- Scan Tip: Register at least two different fingers (such as your right thumb and left index finger) as master admin profiles so you always have a reliable secondary backup.
Step 3: Set Up Secondary Master Passcodes and Apps
In addition to biometric scans, create a strong 6-to-8 digit master administrator code to replace the factory default settings. If your lock features smart app integration, re-pair the device to your smartphone app while standing within Bluetooth range to sync your newly registered admin credentials securely.
Step 4: Verify Admin Lockout Security
Before adding standard user accounts for family members or employees, test your new master administrator fingerprint with the door open. Ensure that unregistered fingers now trigger an error light or rejected chime. Completing this step seals your door security after executing a fingerprint lock reset without admin code access during your initial setup.
If you are setting up a brand-new lock hardware mechanism or replacing an old deadbolt assembly from scratch, review our comprehensive installation walkthrough on How to Install a Fingerprint Door Lock (DIY Guide).
How to Locate the Reset Button on Popular Smart Lock Brands (Yale, Kwikset, Ultraloq, TCL)
To locate the reset button on popular smart lock brands, check the interior escutcheon panel mounted on the inside of your door—typically under the battery cover or near the bottom rim of the handle assembly. While exact button positioning varies by manufacturer, every major brand places this physical micro-switch on the indoor side to protect your home against unauthorized resets.
Because leading smart lock manufacturers design their hardware around unique security layouts, finding the physical reset button on smart lock units depends on the specific brand you own:
Yale Assure & Smart Locks
On most Yale Assure Lock models (like the YRD226 or YRD256), the reset button sits directly on the internal circuit board next to the PCB wire connector. To reach it, remove the battery cover plate, take out all four AA batteries, and unscrew the interior back assembly from the mounting plate. You can view the official reset instructions directly on Yale Home Official Support.
Kwikset Halo & Aura Series
Kwikset smart locks typically feature a clearly labeled reset button inside battery cover compartments. On models like the Kwikset Halo or SmartCode 888, slide the interior plastic window or back cover upward to expose the battery pack. You will see a small circular button labeled “Reset” or a distinct red reset button on electronic lock casing right above the battery housing.
Ultraloq U-Bolt & Bolt Series
Ultraloq smart locks use a discreet, space-saving pinhole design to prevent accidental button presses. On popular models like the Ultraloq U-Bolt Pro, the pinhole reset button on digital door lock housing is located at the very bottom edge of the interior assembly. You must insert a pinhole tool / SIM ejector tool into the small slot for 10 seconds until you hear one long beep followed by two short beeps.
TCL & Generic Biometric Locks
On TCL smart lever locks and similar residential biometric handles, the button is located either directly beneath the rubber protective plug on the interior escutcheon panel or inside the battery tray. Pressing and holding this button for 10 to 15 seconds triggers a full factory default restore, erasing all admin credentials and executing a complete user fingerprint data deletion.
Locating your brand’s specific button ensures a smooth system reboot cycle without forcing off plastic casing or damaging sensitive micro-wiring inside the escutcheon assembly.
If you ever encounter an emergency where the lock’s electronic keypad fails to react during setup, consult our step-by-step walkthrough on How to Open Electronic Door Lock With Code (No Key).
What to Do If the Fingerprint Lock Reset Button Is Not Responding?
If your fingerprint door lock reset button is not responding, first replace all old batteries with four fresh AA alkaline batteries and ensure you are holding the physical micro-switch continuously for a full 15 seconds. An unresponsive reset button is usually caused by low battery voltage interruption, poor electrical contacts, or an improper press angle when using a reset pin.
Troubleshooting an unresponsive reset button requires a systematic approach to isolate electrical, mechanical, and firmware issues. Before assuming the interior circuit board is completely dead, systematically check these common culprits:
- Power & Battery Voltage: Smart lock processors freeze when battery levels drop below 4.8 volts, preventing the reset cycle from triggering. Replace all batteries with fresh 1.5V AA alkaline batteries (avoid rechargeable batteries, which output lower voltage at 1.2V).
- Tool Length & Alignment: If your lock features a pinhole reset button on digital door lock assemblies, standard SIM tools may be too short. Use a rigid, long paperclip and insert it straight into the opening until you feel a distinct tactile click on the micro-switch beneath the interior escutcheon panel.
- Firmware Glitch / Hard Power Cut: Disconnect the main battery pack or remove the wire harness from the interior back panel for 60 seconds to completely drain residual power from the internal capacitors, then reconnect and try again.
- Mechanical Damage or Wear: If the red reset button on electronic lock frames feels mushy or lacks a springy feedback click, the internal button switch may have snapped off the circuit board due to excessive force.
If the button still fails to trigger an audio beep confirmation signal or initiate a factory default restore after a hard power drain, the internal mainboard may require replacement. In such cases, using secondary bypass methods like a master code override or an emergency key override becomes necessary to gain access and prepare the door assembly for repair.
Reset Button vs. Master Code Reset: What is the Difference?
The primary difference is that using a fingerprint door lock reset button forces a complete physical hardware wipe on the circuit board without needing any passwords, while a master code reset requires valid admin credentials to restore factory default settings through the keypad menu. Pressing the physical reset button on smart lock assemblies serves as an emergency fallback when you are locked out or have forgotten your administrative passcode.
Understanding when to use each method depends on your current lock access level and the specific problem you are trying to solve:
- Manual Hardware Trigger: Positioned directly on the interior backing plate or inside the battery housing cavity. This method mandates physical presence on the indoor side of the door. Engaging this switch manually—or using a fine needle tool—purges all stored fingerprint profiles, passcode combinations, and wireless pairings instantly, serving as the ultimate fallback when taking over a previously owned property without administrative permissions.
- Keypad Administrator Reset: Executed directly on the exterior backlit touchscreen by punching in your registered 6-to-8 digit admin PIN alongside specific command strings (such as entering * followed by #, inputting your current master password, and pressing 3). This approach lets you reconfigure device options digitally without taking apart the interior cover or removing the battery housing.
While both methods return the lock to its original factory default restore condition and initiate a system reboot cycle followed by an audio beep confirmation signal, relying on the physical red reset button on electronic lock frames bypasses forgotten passcodes entirely. If software glitches prevent the keypad from recognizing your master administrator fingerprint, the physical button guarantees a clean reset.
Factory Reset vs. Reprogramming: When Should You Use the Reset Button?
You should use the fingerprint door lock reset button only when you need a complete system wipe due to forgotten admin codes or severe software glitches, whereas routine reprogramming should be used when simply adding or deleting individual user fingerprints. Opting for a full hardware reset erases all stored data, making it a last resort compared to targeted menu updates.
Knowing when to choose between a full factory reset and standard reprogramming saves time and prevents unnecessary administrative hassle. For instance, if you are moving into a new home or selling a property in the US, clearing out all previous user profiles via a factory reset is essential. However, if you simply want to add a new guest pin or remove an old roommate’s fingerprint, reprogramming via the keypad menu is much faster because it preserves your existing settings.
Here is how to decide which method fits your situation:
- Use Reprogramming When: You need to add new user fingerprints, update temporary access codes, or adjust auto-lock timer delays through the admin menu without losing your current master setup.
- Use the Physical Reset Button When: You are completely locked out due to a forgotten master password, experiencing unresolving firmware freezes, or taking over a pre-owned smart lock where no previous admin credentials are known.
Executing a full factory reset initiates a complete user fingerprint data deletion and triggers a system reboot cycle on the interior escutcheon panel. While a red reset button on electronic lock frames or a pinhole reset button on digital door lock assemblies provides a clean slate, routine reprogramming keeps your daily security configurations intact.
Essential Safety Precautions Before Pressing the Reset Button
Before pressing the fingerprint door lock reset button, always prop your front door wide open and verify you have a physical backup key or external power source on hand to prevent accidental lockouts. Failing to take basic precautions before executing a factory reset can leave you stranded outside your home if the motorized latch engages during the memory wipe.
Taking a few minutes to prepare your hardware setup prevents common security traps and installation headaches. When a smart lock undergoes a factory default restore, it immediately wipes all credentials, meaning any automatic latch retraction features or temporary codes will stop working until you manually reprogram the device.
Keep these practical safety rules in mind before touching your lock’s internal components:
- Prop the Door Open: Never test a hard reset with the door closed and bolted. Secure the latch in the retracted position or use a doorstop to keep the entryway open until you re-enroll your master administrator fingerprint.
- Keep a Physical Key Accessible: Ensure you have the traditional metal backup key handy. Many electronic locks default to a locked deadbolt state the moment the system reboot cycle initiates.
- Check Battery Levels: Never attempt a reset if your batteries are critically low. A sudden low battery voltage interruption mid-wipe can corrupt the internal firmware on the escutcheon panel circuit board.
- Confirm Your Setup Tools: Have your pinhole tool / SIM ejector tool or a sturdy paperclip ready so you can press the physical reset button on smart lock assemblies accurately without slipping and damaging internal wiring.
Following these precautions ensures you can safely execute a user fingerprint data deletion or troubleshoot a red reset button on electronic lock frames without risking a costly lockout.
If you ever run into alignment problems or find your latch binding after resetting your hardware, check out our helpful guide on How to Install a Fingerprint Door Lock (DIY Guide).
Frequently Asked Questions
How do I reset my smart door lock?
Remove the interior battery cover, locate the physical reset button (or pinhole switch) on the back panel, and hold it down for 10 to 15 seconds until the system beeps or flashes to confirm a factory default restore.
How do I reset my door lock?
Keep your door propped open, access the indoor escutcheon panel, press and hold the internal reset micro-switch until it reboots, and immediately re-program a new master code.
How do I reset a lock if I forgot the code?
Bypass forgotten passcodes entirely by utilizing the hardware reset button located inside the battery compartment, which wipes old credentials and restores factory defaults so you can set a new admin code.
How to reset automatic door locks?
Wake up the lock keypad, remove the interior battery cover and one battery, press and hold the reset button while reinstalling the battery, and release when you hear a long confirmation beep.
How to reset keyless door entry?
Locate the programming or reset button behind the interior cover panel, press it continuously for about 10 seconds until the system cycles, and re-enter your desired access codes.
How do I reset my digital lock?
Open the indoor back panel, press the internal reset switch with a pinhole tool or finger until the unit power-cycles, and follow the initial manufacturer setup prompts to re-pair user settings.
How to reset one touch door lock?
Hold down the interior reset button for 10 to 15 seconds until the lock signals a successful memory wipe, then test your new administrative credentials with the door open.